Why I chose to make this costume:
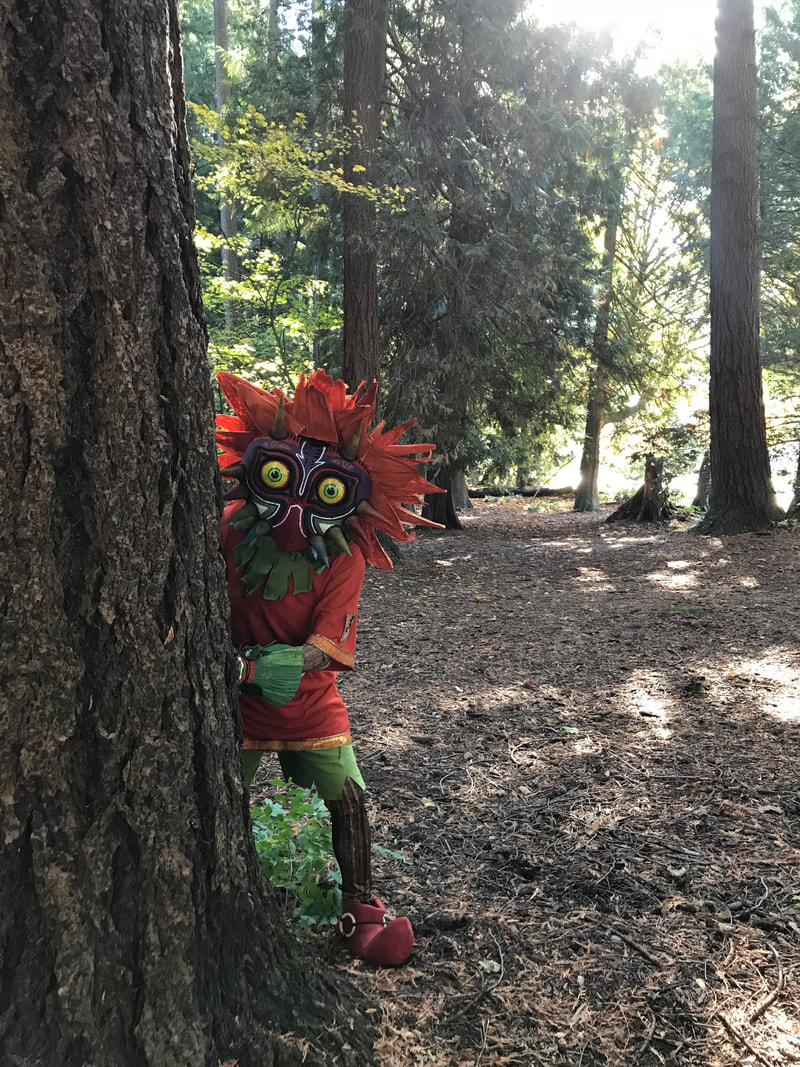
If I hadn't already it abundantly clear in other posts, I'm a HUGE Zelda fan. As a kid I just couldn't get enough of playing Ocarina of Time, and when Majora's Mask came out I was super stoked. There was just something about the darkness in the story and characters that really resonated with me. The real inspiration for this costume came from the first time I saw the fan made short film "Terrible Fate" by Emberlab. The love and passion that they put into creating a back story for Skull Kid was truly incredible, and the design of the character showed just how realistic he could be.
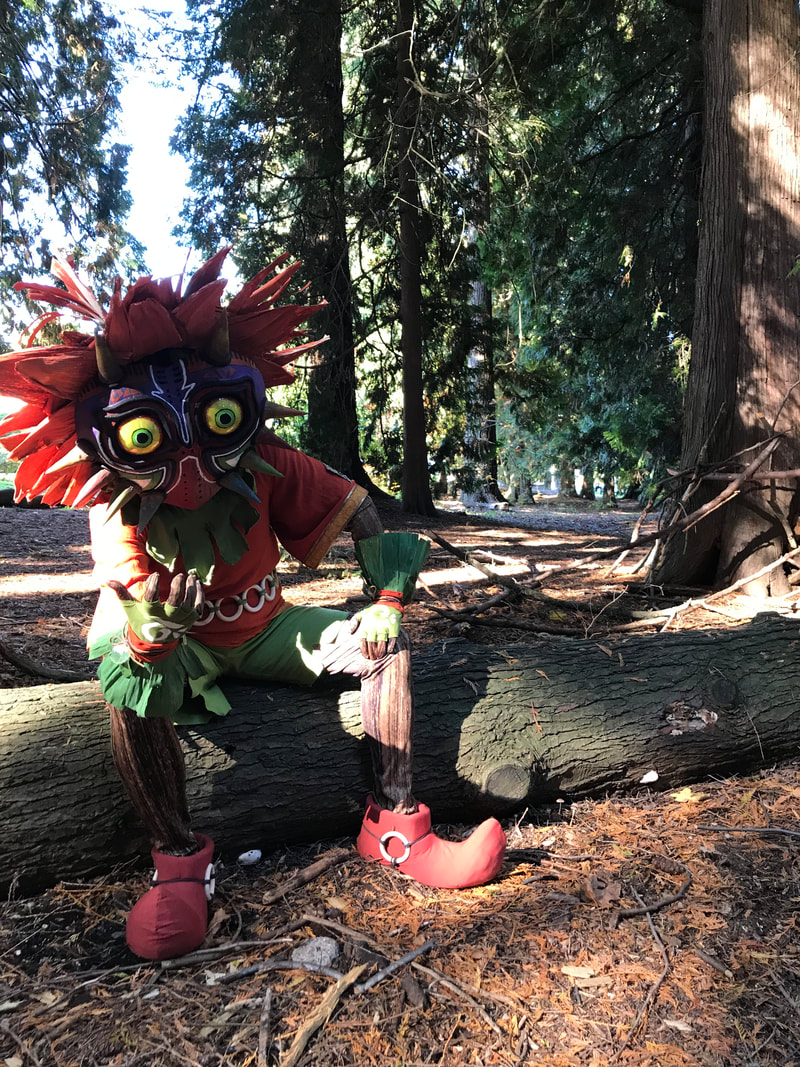
I used their version of skull kid as a basis for my design, and went hyper realistic. I have never felt so at home in a costume, or so comfortable.
Another reason I chose skull kid is, even though his overall construction is simple, the large picture was a huge challenge! Trying to find just the right fabrics, accessories, leaves (yes real leaves), and learning to make sewing patterns from scratch.
How I made this costume:
I spent a lot of hours debating where I would start, what materials I would need and how to best get that "kid in adult clothing" look. I started by watching tutorials on how to make a T-Shirt pattern from an existing shirt. I made a dummy shirt with multiple alterations to it, before getting it right and make the actual shirt. Next was figuring out the best way to get the details on the edges of the shirt. I bought multiple types of ribbon with intricate patterns, some gold inlay, laser cut etc just trying to get the right aesthetic. I finally settled on some iron on edging I found, and some gold edged ribbon as an overlay. I used stitch-witchery to iron it all on to my shirt so as not to get seam lines. When the iron got a little too hot, it was an added bonus as it would melt some of the ribbon, giving it that roughed up and burnt look. I sewed on the patches on the base of the shirt with extra thick black thread, layering it with each stitch to make it thicker. The rawhide patch on my shoulder was purchased and ironed on.
From here, I moved onto the shorts. I found a simple pattern for pajama pants, which I then altered to make shorter and changed the waist band from a draw string to an elastic. I then cut up the base edges, and only hemmed where they would be possible fraying.
The gloves were step three, and they turned out to be a major challenge. I tried first using the same green flannel fabric as I used for the shorts. This turned out to be not a great idea since flannel has very little to no stretch at all, and the gloves would have been extremely oversized. Next I went and found a sewing pattern, which turned out to be a good base, but I couldn't use the pattern exactly as intended. The body of the gloves is a green 4 way stretch knit, and once you cut that out to sew the edges, your sewing machine likes to snack on it. I deemed it much easier to use part of the sewing pattern as a base, trace it out, and sew it together before cutting it out. I then sewed and attached the cuffs, using craft foam as an interfacing to make the cuffs stand up. I tried moving on right to adding the leaves on the gloves next, but this also became a challenge. Strips of fabric looked wrong, false plants were either too expensive or unavailable, so I had to do more research.
For the body suit, I had my incredibly talented friend help me out and create a wood print pattern. I then took her photoshop design and had it custom printed on 4m of spandex. I then followed a Jolie pattern to make the full bodysuit.
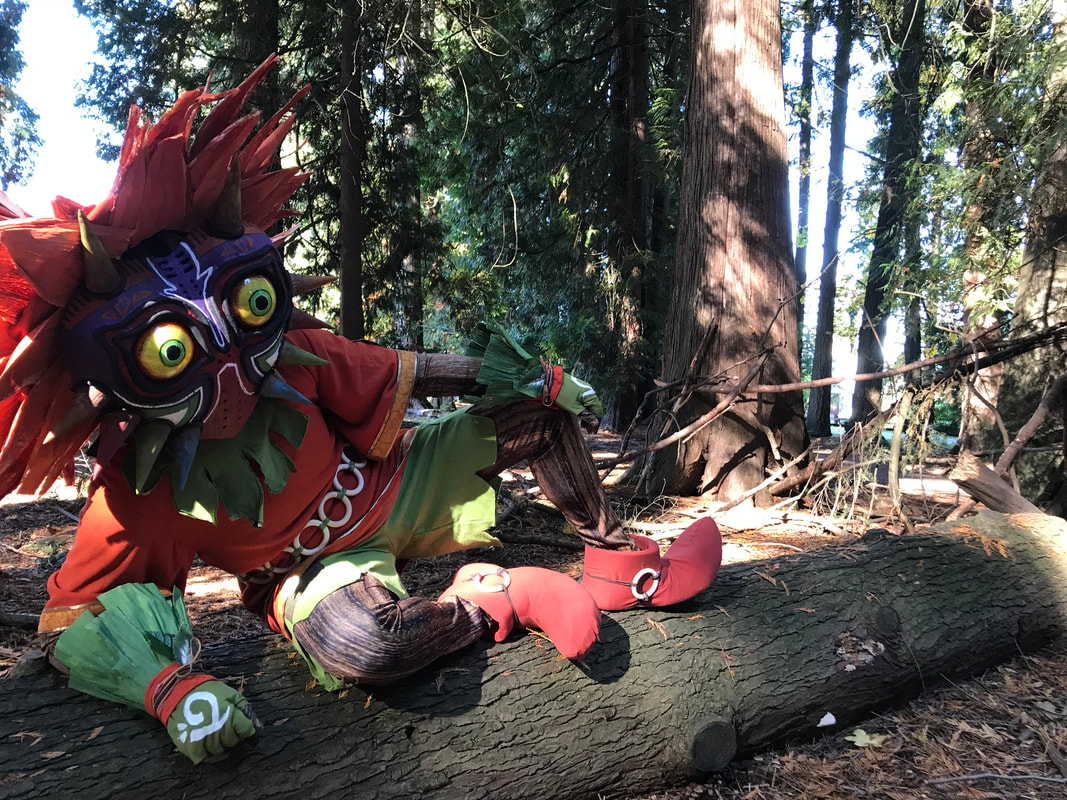
The shoes were also a big challenge for me. I bought a pair of converse all stars as the base and then with assistance from another amazingly talented friend, we attached cusion foam to all sides of the shoe, glued it on and carved the foam until we had the right shape for the shoes. I then used a rusty colour 4 way stretch knit fabric and pinned it all the way around the shoes. Once I had it fitted correctly, I basted the fabric and sewed it together, making a cover for the shoe.
For the collar I followed a tutorial for how to make a turtleneck sweater. Creating a stretchy collar, and a base that I could lay over my back and chest. I started by trying to attach leaves to it, but that didn't turn out. So as an homage to the N64 Version of skull kid, I cut out chunks of fabric, making it super rough, sewed flannel to the back for stability and weight, then added some small fake leaves to bring it all together.
Now the biggest challenges...the hat, accessories and of course...the Mask.
The hat, along with the gloves and collar needed leaves. Lots of leaves. I ended up buying a ton of corn husks! They worked great! They are super sturdy, they absorb the paint really well, and well I still have a ton of corn husks if I have maintenance to do. I spent hours painting them green and orange, and then laying them out on the gloves, and the hat making sure I had enough to cover everything I had to. Once the corn husks were sewn onto the gloves, I was able to make the orange cuffs, and glued some rawhide strands to it to make it look like it had been tied on.
I sewed corn husks to bias tape, and then glue the bias tape onto the hat. Layering and layering the leaves until the wicker hat base was completely covered. The husks at the top were inserted into a chunk of upholstery foam, and then glued to the top of the hat, corns husks glued on top to hide the foam. Once that was all put together, we realized people would be seeing the underside of the hat as well. I glued on a layer of orange fabric, and then layers of corn husks here as well.
For the accessories, I ordered wooden teething and macrame rings off of amazon. I got multiple sizes, 50mm, 65mm, 70mm and 100mm. I attached the rings together by tying rafia around them and gluing the rafia to itself. For the belt I then added a loop fastener to the back to keep the aesthetic but also make it functional. The rings on the shoes were tied on using rawhide.
Finally...the Mask. The mask was a whole new area for me. I'm not used to doing foam work, and this was my first time working with Worbla. Luckily I found this awesome tutorial on line, with a pattern for the size and shape of the mask. My friend and I cut it out of 5mm craftfoam, glued it all together to form fit it. Next using thin strips of 6mm craft foam, we cut out all the details for the top of the mask, and we cut out the eyes. We then covered the entire mask in black worbla. Heating and stretching until the whole thing was covered, and patching where we needed to. The horns were made seperately, out of 2mm craft foam, and then wrapped in worbla. We used E6000 glue to seal all the worbla seams, attach the horns to the mask as well as some hot glue on the basis. We then created worbla noodles, and attached them by heating the worbla up, sticking it to itself and gluing it all together. I then spent a few hours, reheating the finished mask, and using a small sculpting tool to dig out wood grain and grooves in the face. For the eyes, we used a 10mm Christmas Ball as a base and heat formed clear worbla over the top to get the dome shape. From here, we heated the edges and attached the eyes to the inside of the mask. Adhering it to the black worbla, and using hot glue and E6000. The last steps were painting it. The body of the mask is painted with acrylic paint. The inside of the eyes were painted with a combination of acrylic and enamel based paints. I used transparent enamel paint around the edges so that I could see through the finished eyes. We also did some experimenting to put LEDs into the eyes, but once we found out the acrylic would bounce the light back, we scrapped the idea for safety purposes. The finishing touch was adding elastics fitted to my head, and a layer of black felt to make it nice and soft against my face.
Thoughts on this costume:
This is by far my favourite costume I have made. It's both comfortable and functional and completely fits the character. It made me really think, challenge myself and be innovative. Popularity wise, it is also definitely my most successful costume as I couldn't walk 2 feet without being stopped by multiple people.
If I hadn't already it abundantly clear in other posts, I'm a HUGE Zelda fan. As a kid I just couldn't get enough of playing Ocarina of Time, and when Majora's Mask came out I was super stoked. There was just something about the darkness in the story and characters that really resonated with me. The real inspiration for this costume came from the first time I saw the fan made short film "Terrible Fate" by Emberlab. The love and passion that they put into creating a back story for Skull Kid was truly incredible, and the design of the character showed just how realistic he could be.
I used their version of skull kid as a basis for my design, and went hyper realistic. I have never felt so at home in a costume, or so comfortable.
Another reason I chose skull kid is, even though his overall construction is simple, the large picture was a huge challenge! Trying to find just the right fabrics, accessories, leaves (yes real leaves), and learning to make sewing patterns from scratch.
How I made this costume:
I spent a lot of hours debating where I would start, what materials I would need and how to best get that "kid in adult clothing" look. I started by watching tutorials on how to make a T-Shirt pattern from an existing shirt. I made a dummy shirt with multiple alterations to it, before getting it right and make the actual shirt. Next was figuring out the best way to get the details on the edges of the shirt. I bought multiple types of ribbon with intricate patterns, some gold inlay, laser cut etc just trying to get the right aesthetic. I finally settled on some iron on edging I found, and some gold edged ribbon as an overlay. I used stitch-witchery to iron it all on to my shirt so as not to get seam lines. When the iron got a little too hot, it was an added bonus as it would melt some of the ribbon, giving it that roughed up and burnt look. I sewed on the patches on the base of the shirt with extra thick black thread, layering it with each stitch to make it thicker. The rawhide patch on my shoulder was purchased and ironed on.
From here, I moved onto the shorts. I found a simple pattern for pajama pants, which I then altered to make shorter and changed the waist band from a draw string to an elastic. I then cut up the base edges, and only hemmed where they would be possible fraying.
The gloves were step three, and they turned out to be a major challenge. I tried first using the same green flannel fabric as I used for the shorts. This turned out to be not a great idea since flannel has very little to no stretch at all, and the gloves would have been extremely oversized. Next I went and found a sewing pattern, which turned out to be a good base, but I couldn't use the pattern exactly as intended. The body of the gloves is a green 4 way stretch knit, and once you cut that out to sew the edges, your sewing machine likes to snack on it. I deemed it much easier to use part of the sewing pattern as a base, trace it out, and sew it together before cutting it out. I then sewed and attached the cuffs, using craft foam as an interfacing to make the cuffs stand up. I tried moving on right to adding the leaves on the gloves next, but this also became a challenge. Strips of fabric looked wrong, false plants were either too expensive or unavailable, so I had to do more research.
For the body suit, I had my incredibly talented friend help me out and create a wood print pattern. I then took her photoshop design and had it custom printed on 4m of spandex. I then followed a Jolie pattern to make the full bodysuit.
The shoes were also a big challenge for me. I bought a pair of converse all stars as the base and then with assistance from another amazingly talented friend, we attached cusion foam to all sides of the shoe, glued it on and carved the foam until we had the right shape for the shoes. I then used a rusty colour 4 way stretch knit fabric and pinned it all the way around the shoes. Once I had it fitted correctly, I basted the fabric and sewed it together, making a cover for the shoe.
For the collar I followed a tutorial for how to make a turtleneck sweater. Creating a stretchy collar, and a base that I could lay over my back and chest. I started by trying to attach leaves to it, but that didn't turn out. So as an homage to the N64 Version of skull kid, I cut out chunks of fabric, making it super rough, sewed flannel to the back for stability and weight, then added some small fake leaves to bring it all together.
Now the biggest challenges...the hat, accessories and of course...the Mask.
The hat, along with the gloves and collar needed leaves. Lots of leaves. I ended up buying a ton of corn husks! They worked great! They are super sturdy, they absorb the paint really well, and well I still have a ton of corn husks if I have maintenance to do. I spent hours painting them green and orange, and then laying them out on the gloves, and the hat making sure I had enough to cover everything I had to. Once the corn husks were sewn onto the gloves, I was able to make the orange cuffs, and glued some rawhide strands to it to make it look like it had been tied on.
I sewed corn husks to bias tape, and then glue the bias tape onto the hat. Layering and layering the leaves until the wicker hat base was completely covered. The husks at the top were inserted into a chunk of upholstery foam, and then glued to the top of the hat, corns husks glued on top to hide the foam. Once that was all put together, we realized people would be seeing the underside of the hat as well. I glued on a layer of orange fabric, and then layers of corn husks here as well.
For the accessories, I ordered wooden teething and macrame rings off of amazon. I got multiple sizes, 50mm, 65mm, 70mm and 100mm. I attached the rings together by tying rafia around them and gluing the rafia to itself. For the belt I then added a loop fastener to the back to keep the aesthetic but also make it functional. The rings on the shoes were tied on using rawhide.
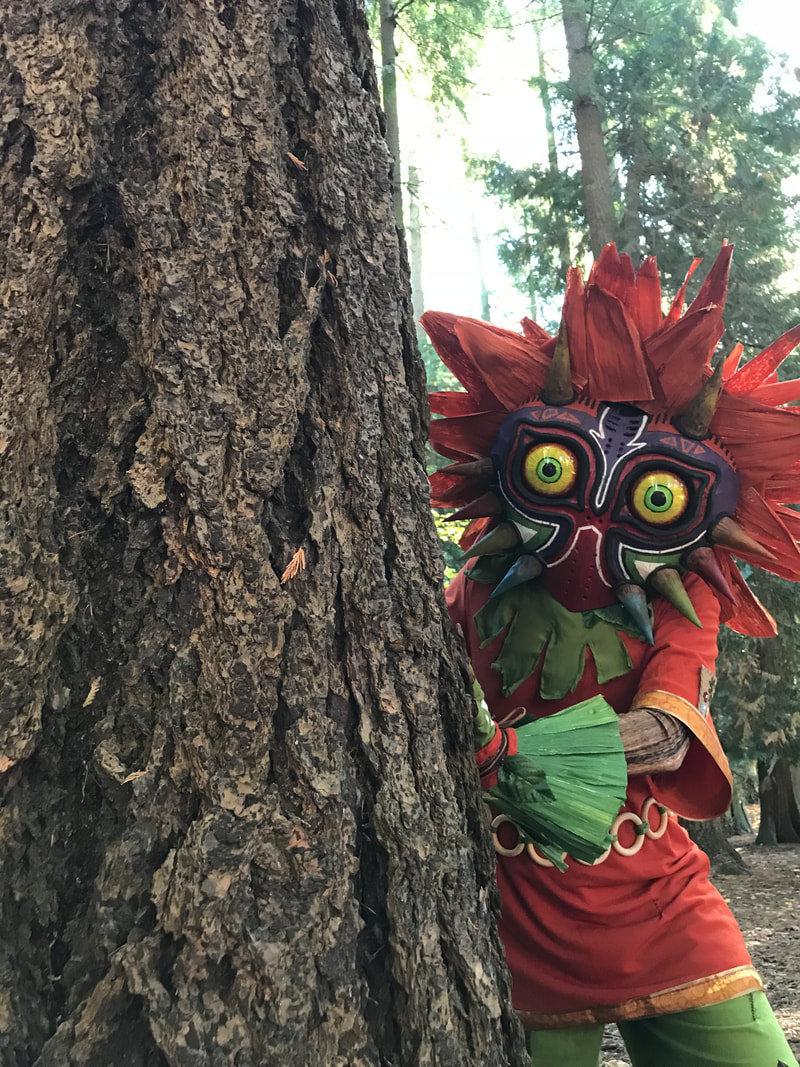
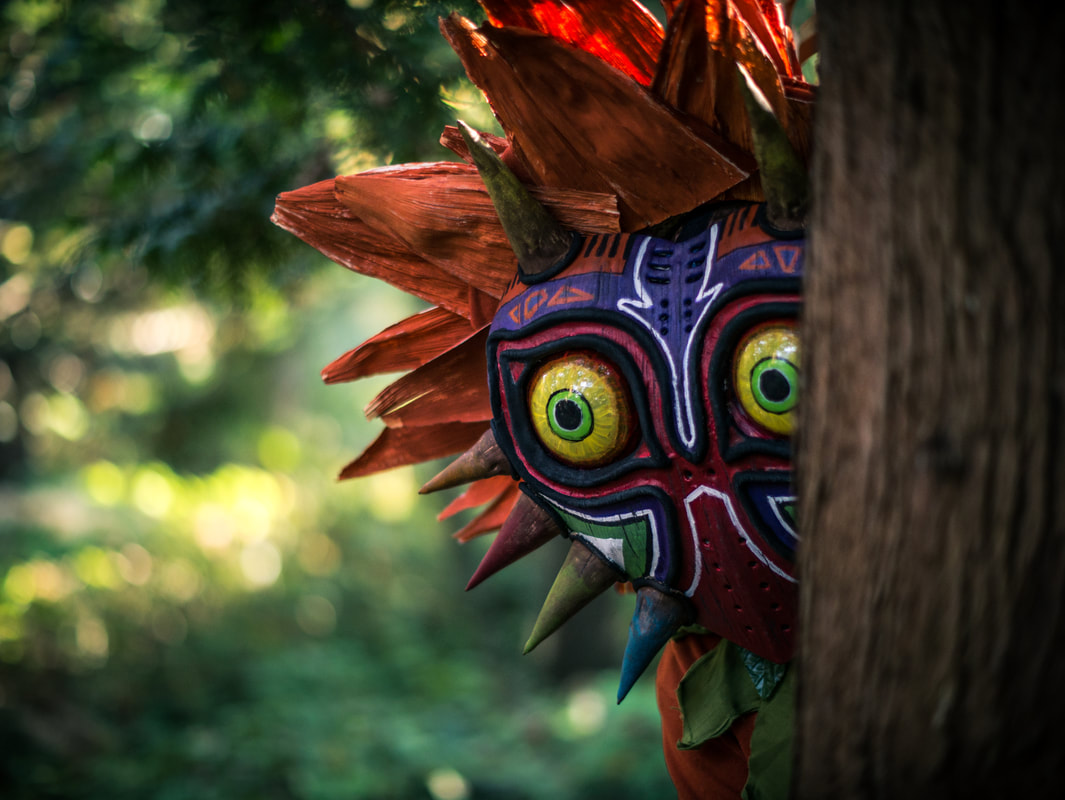
Finally...the Mask. The mask was a whole new area for me. I'm not used to doing foam work, and this was my first time working with Worbla. Luckily I found this awesome tutorial on line, with a pattern for the size and shape of the mask. My friend and I cut it out of 5mm craftfoam, glued it all together to form fit it. Next using thin strips of 6mm craft foam, we cut out all the details for the top of the mask, and we cut out the eyes. We then covered the entire mask in black worbla. Heating and stretching until the whole thing was covered, and patching where we needed to. The horns were made seperately, out of 2mm craft foam, and then wrapped in worbla. We used E6000 glue to seal all the worbla seams, attach the horns to the mask as well as some hot glue on the basis. We then created worbla noodles, and attached them by heating the worbla up, sticking it to itself and gluing it all together. I then spent a few hours, reheating the finished mask, and using a small sculpting tool to dig out wood grain and grooves in the face. For the eyes, we used a 10mm Christmas Ball as a base and heat formed clear worbla over the top to get the dome shape. From here, we heated the edges and attached the eyes to the inside of the mask. Adhering it to the black worbla, and using hot glue and E6000. The last steps were painting it. The body of the mask is painted with acrylic paint. The inside of the eyes were painted with a combination of acrylic and enamel based paints. I used transparent enamel paint around the edges so that I could see through the finished eyes. We also did some experimenting to put LEDs into the eyes, but once we found out the acrylic would bounce the light back, we scrapped the idea for safety purposes. The finishing touch was adding elastics fitted to my head, and a layer of black felt to make it nice and soft against my face.
Thoughts on this costume:
This is by far my favourite costume I have made. It's both comfortable and functional and completely fits the character. It made me really think, challenge myself and be innovative. Popularity wise, it is also definitely my most successful costume as I couldn't walk 2 feet without being stopped by multiple people.
Appearances:
Fan Expo Vancouver - 2018
Fan Expo Vancouver - 2019
Awards:
1st place - Master Class - Fan Expo Vancover 2019
Fan Expo Vancouver - 2018
Fan Expo Vancouver - 2019
Awards:
1st place - Master Class - Fan Expo Vancover 2019