Why I chose to make this costume:
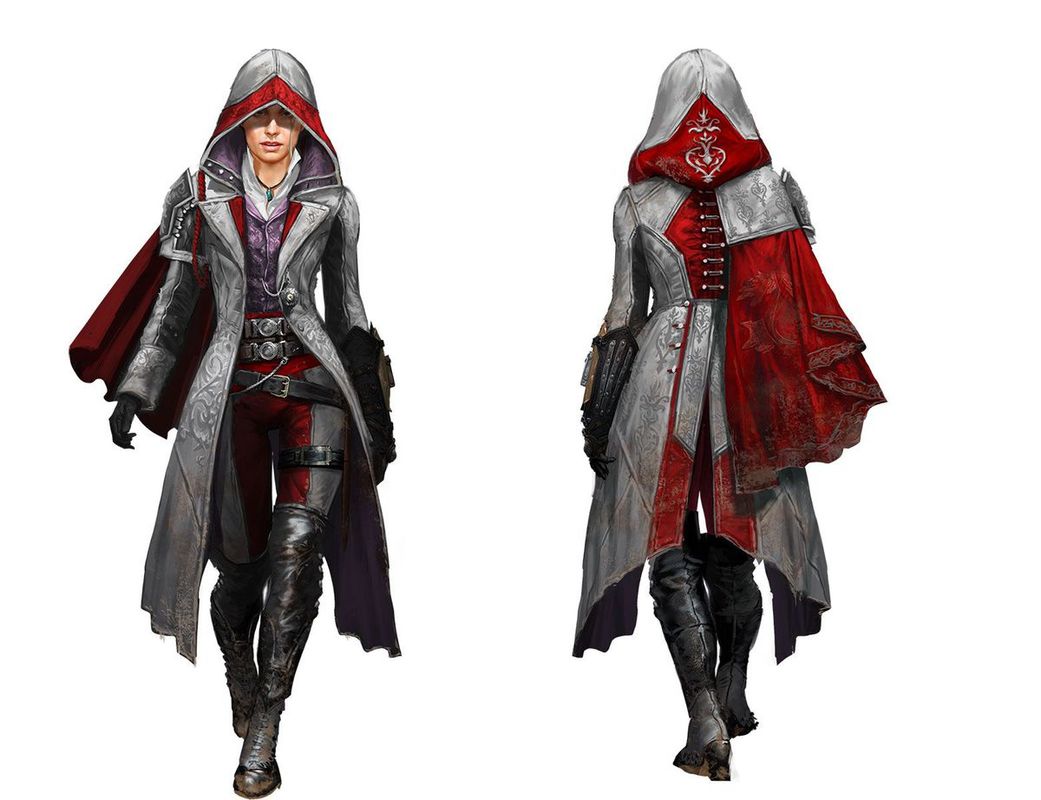
My Husband and I are both HUGE Assassin's Creed fans, I mean HUGE. We collect all the figures, buy all the games, soundtracks etc. When Syndicate came out I was over the moon that we had our first real main stream female assassin, and on top of that it's in the industrial era which means...Victorian & Steampunk. All things I absolutely love! When I saw this particular design for Evie I was super excited because, if I were to make this cosplay...not only would I get to be Evie Frye BUT I would get to pay homage to my favourite assassin, Ezio Auditore. I love how the designers took the Italian renaissance look and made it more victorian and feminine for this piece. I know in the game the costume is slightly altered in colour and detail, but I wanted to do closer to the concept art.
How I made this costume:
Jacket:
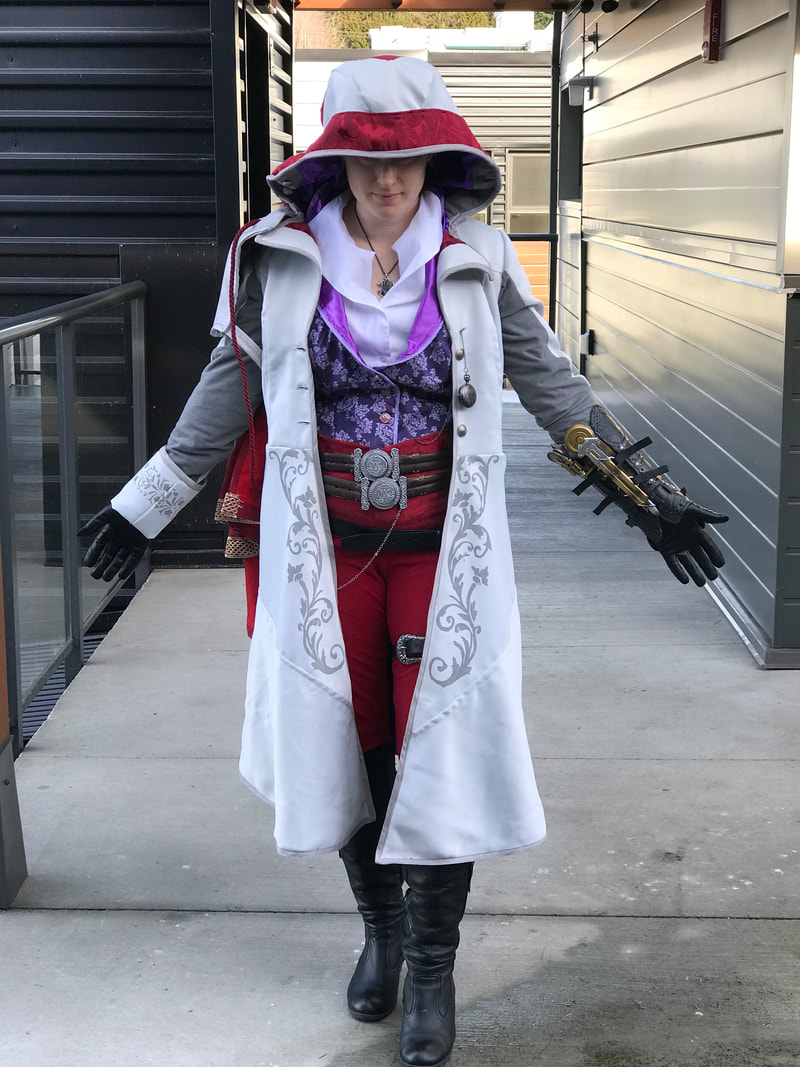
This is by far the most complicated costume I have made to date. The amount of things I had to learn and research in order to make this a reality was staggering. I was planning this costume for a few years before even attempting to take it on. When I finally got started, I chose a Simplicity pattern as the base of the jacket as it had all the features I would need to get the design close to the concept art. I did the one thing I have never done with a costume, which was making a muslin, or a draft. I first made the simplicity pattern as intended using scrap fabric, and then I drew out the new pattern design I wanted on that muslin, cutting it out to make new pattern pieces. I transferred all of that to paper, then I moved on to cutting out the new pattern in scrap fabric and stitching all of them together to make sure it would work. Once I was happy with the results I moved onto cutting out the good fabric and lining fabric and started stitching. Even here, I un-stitched pieces multiple times to move them over tiny bit by tiny bit until I had my placement and fit just so on both the lining and inner jacket. Next I went on to stitch all the buttons and chord to the back of the jacket, and added button holes to the jacket skirt near the split. Once I had everything stitched in place, I basted all the edges of the jacket together and stitched bias tape around the jacket for a nice finished look. Lastly I stitched in the button holes on the front of the bodice and hood then stitched all the remaining buttons on.
Pants:
The pants were relatively simple as I just followed the pattern I chose, but with the contrasting fabrics it got a bit confusing since my contrast was the regular fabric according to the pattern and vice versa. Also by using a vogue pattern there were some more challenging sewing techniques that I had to look up in order to get the fly into the pants correctly. Overall I'm happy with how the pants turned out and they are quite comfortable!
Blouse:
This is by far the best blouse I have ever made. I am super happy with the fit of it. I chose a McCalls pattern that allowed for multiple fits and styles. It's the first pattern of it's type I have used, so I really enjoyed all the extra advice tidbits laid throughout the instructions. It gives the blouse a professional finished look to it. Again, this was rather simple as I just followed the pattern and instructions in order to sew it together, though right when I was finishing the blouse I ran into a tiny problem. I was opening up my last button hole on the sleeve cuff, when my seam ripper decided to rip cleanly right through the edge of the cuff. This is something you can't easily just stitch back together and fix, so I ended up removing the whole sleeve cuff and attaching a new one. This was a little challenging since the rest of the blouse was already put together, and normally when attaching a cuff, your fabric is completely flat and not stitched together all the way. But I managed to get it done and it looks great!
Vest:
For the vest I had some difficulties. I started out with a McCall's pattern that I had chosen and after cutting out the pieces, basting it together and trying it on, I realized that this vest was going to be way too big on me and much too long for the character. I then purchased the New Look pattern that I ended up completing the vest with. The challenge here was I had no spare fabric left, and since I had bought the fabric for the vest a few years before starting it, there was no way I could pick up more. I had to cut out the new pattern pieces from the old, already cut pieces. This meant I wouldn't have enough fabric to cover the entire vest. I ended up piece mealing it all together, using my chosen cotton for the front panels and belt, a dark purple satin for the back, and light purple satin for the lining and collar. After following the pattern and stitching it all together, It fits rather well, but I do find it puckers a little bit in the shoulders. If I were to use this pattern again, I would definitely resize the shoulder area to have it a little more fitted.
Pauldron & Guard:
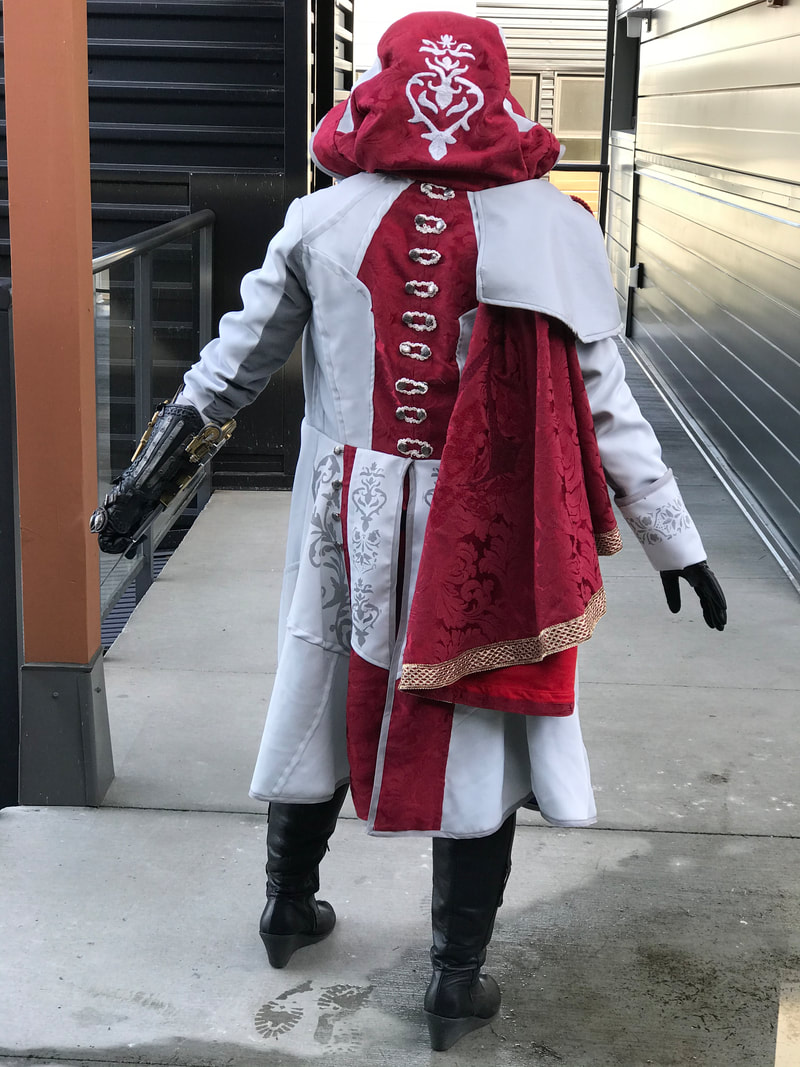
The pauldron was made in a few stages. First I made a pattern of my shoulder using cling wrap and masking tape. Next I cut out the pattern pieces in craft foam, then glued fabric to it. This didn't really work. So next version, cut out the pieces from EVA foam to give it more thickness, then glued down the fabric around it. The hot glue started to peel and fabric started coming off. Plus when it was placed on my shoulder it was rather big and bulky, not really like Evie Frye. For the final rendition, I cut out the pattern pieces from both fake leather, and the same grey material I used on the jacket. I then stitched them together and used the grey fabric as lining. Finally I unstitched the hood from the jacket, and slipped the pauldron into the neck line. Stitching everything together into one piece. Now it sits perfectly and looks like it belongs. I also opened up the top seam and slipped in the red decorative cord, then stitched it back up. The other side of the chord is attached to an epaulette on the shoulder underneath the pauldron.
I added a strap around the bottom of it, just as in the concept art, and attached it to the back panel using velcro.
The guard was made with 5mm EVA foam and the details were sculpted on with foam clay. I found the design on line, and cut it out as a stencil so we knew were to place the clay foam. Once it was cured, it was covered in worbla, painted with gesso and sanded down to make it nice and smooth. I painted it with silver spray paint and black wash to get that metal look and feel. Finally I attached the button loops to the front side with another small strip of worbla and a bit of glue to hold everything in place.
Next I attached it to the pauldron using velcro, and sewed the buttons to the pauldron where the loops line up.
Belts:
The belts are all re-purposed. I went to a film wardrobe sale and picked up four belts for cheap. The buckles are 3D printed and I bought them online. They were painted with spray paint and black wash, and finished with mod podge.
For the leg belt, I chose a slim black belt with an intricate buckle and cap. I wrapped it around my thigh for size, then cut it to the length I needed. I then re-shaped the end of the leather and placed the metal cap back on. Finishing off the belt by adding new holes with leather punch and awl.
The two centre belts were exactly the right size for my hips/waist and so I didn't want to make too many alterations in case they didn't fit again. I unstitched the front of the belt and removed the existing buckle, replacing it with one of the 3D printed buckles that I bought and stitching it back in place. On the opposite end of the belt, I added more holes to the edges, and wrapped it through the other side of the buckle, stitching it in place.
Finally I sewed a cummerbund from the same fabric as on the jacket and cape. I added some belt loops to hold things in place, but ended up not needing to use most of those loops.
Cape:
For the Cape, I had some help figuring out how the pattern should look in order for it to fold and fall correctly over the shoulder. I then cut out two capes, 1 for lining and 1 of the outer fabric and stitched them together. I lined the edge with a gold ribbon I found. Then I passed the cape off to a friend who embroidered the Assassin's Creed logo on it.
In order to attach the cape to the jacket, I bunched up the top and fastened it underneath an epaulette, and attached two industrial snaps to the cape and jacket. This was to ensure that it wouldn't slide or pull the jacket as I am walking around conventions!
The only things on this costume I didn't actually make were the gloves, the hidden blade, the belt buckles and the boots.
Thoughts on this costume:
I am so over the moon on how this costume turned out. There were a lot of learning curves for this piece, and a lot of things that went wrong which was disheartening and very hard to push through. But I am so glad that I did persevere. It's the most complicated costume I have made to date, but also the most detailed, super comfortable and easy to maneuver. I can't wait to show this one off!
In progress photos
My Husband and I are both HUGE Assassin's Creed fans, I mean HUGE. We collect all the figures, buy all the games, soundtracks etc. When Syndicate came out I was over the moon that we had our first real main stream female assassin, and on top of that it's in the industrial era which means...Victorian & Steampunk. All things I absolutely love! When I saw this particular design for Evie I was super excited because, if I were to make this cosplay...not only would I get to be Evie Frye BUT I would get to pay homage to my favourite assassin, Ezio Auditore. I love how the designers took the Italian renaissance look and made it more victorian and feminine for this piece. I know in the game the costume is slightly altered in colour and detail, but I wanted to do closer to the concept art.
How I made this costume:
Jacket:
This is by far the most complicated costume I have made to date. The amount of things I had to learn and research in order to make this a reality was staggering. I was planning this costume for a few years before even attempting to take it on. When I finally got started, I chose a Simplicity pattern as the base of the jacket as it had all the features I would need to get the design close to the concept art. I did the one thing I have never done with a costume, which was making a muslin, or a draft. I first made the simplicity pattern as intended using scrap fabric, and then I drew out the new pattern design I wanted on that muslin, cutting it out to make new pattern pieces. I transferred all of that to paper, then I moved on to cutting out the new pattern in scrap fabric and stitching all of them together to make sure it would work. Once I was happy with the results I moved onto cutting out the good fabric and lining fabric and started stitching. Even here, I un-stitched pieces multiple times to move them over tiny bit by tiny bit until I had my placement and fit just so on both the lining and inner jacket. Next I went on to stitch all the buttons and chord to the back of the jacket, and added button holes to the jacket skirt near the split. Once I had everything stitched in place, I basted all the edges of the jacket together and stitched bias tape around the jacket for a nice finished look. Lastly I stitched in the button holes on the front of the bodice and hood then stitched all the remaining buttons on.
Pants:
The pants were relatively simple as I just followed the pattern I chose, but with the contrasting fabrics it got a bit confusing since my contrast was the regular fabric according to the pattern and vice versa. Also by using a vogue pattern there were some more challenging sewing techniques that I had to look up in order to get the fly into the pants correctly. Overall I'm happy with how the pants turned out and they are quite comfortable!
Blouse:
This is by far the best blouse I have ever made. I am super happy with the fit of it. I chose a McCalls pattern that allowed for multiple fits and styles. It's the first pattern of it's type I have used, so I really enjoyed all the extra advice tidbits laid throughout the instructions. It gives the blouse a professional finished look to it. Again, this was rather simple as I just followed the pattern and instructions in order to sew it together, though right when I was finishing the blouse I ran into a tiny problem. I was opening up my last button hole on the sleeve cuff, when my seam ripper decided to rip cleanly right through the edge of the cuff. This is something you can't easily just stitch back together and fix, so I ended up removing the whole sleeve cuff and attaching a new one. This was a little challenging since the rest of the blouse was already put together, and normally when attaching a cuff, your fabric is completely flat and not stitched together all the way. But I managed to get it done and it looks great!
Vest:
For the vest I had some difficulties. I started out with a McCall's pattern that I had chosen and after cutting out the pieces, basting it together and trying it on, I realized that this vest was going to be way too big on me and much too long for the character. I then purchased the New Look pattern that I ended up completing the vest with. The challenge here was I had no spare fabric left, and since I had bought the fabric for the vest a few years before starting it, there was no way I could pick up more. I had to cut out the new pattern pieces from the old, already cut pieces. This meant I wouldn't have enough fabric to cover the entire vest. I ended up piece mealing it all together, using my chosen cotton for the front panels and belt, a dark purple satin for the back, and light purple satin for the lining and collar. After following the pattern and stitching it all together, It fits rather well, but I do find it puckers a little bit in the shoulders. If I were to use this pattern again, I would definitely resize the shoulder area to have it a little more fitted.
Pauldron & Guard:
The pauldron was made in a few stages. First I made a pattern of my shoulder using cling wrap and masking tape. Next I cut out the pattern pieces in craft foam, then glued fabric to it. This didn't really work. So next version, cut out the pieces from EVA foam to give it more thickness, then glued down the fabric around it. The hot glue started to peel and fabric started coming off. Plus when it was placed on my shoulder it was rather big and bulky, not really like Evie Frye. For the final rendition, I cut out the pattern pieces from both fake leather, and the same grey material I used on the jacket. I then stitched them together and used the grey fabric as lining. Finally I unstitched the hood from the jacket, and slipped the pauldron into the neck line. Stitching everything together into one piece. Now it sits perfectly and looks like it belongs. I also opened up the top seam and slipped in the red decorative cord, then stitched it back up. The other side of the chord is attached to an epaulette on the shoulder underneath the pauldron.
I added a strap around the bottom of it, just as in the concept art, and attached it to the back panel using velcro.
The guard was made with 5mm EVA foam and the details were sculpted on with foam clay. I found the design on line, and cut it out as a stencil so we knew were to place the clay foam. Once it was cured, it was covered in worbla, painted with gesso and sanded down to make it nice and smooth. I painted it with silver spray paint and black wash to get that metal look and feel. Finally I attached the button loops to the front side with another small strip of worbla and a bit of glue to hold everything in place.
Next I attached it to the pauldron using velcro, and sewed the buttons to the pauldron where the loops line up.
Belts:
The belts are all re-purposed. I went to a film wardrobe sale and picked up four belts for cheap. The buckles are 3D printed and I bought them online. They were painted with spray paint and black wash, and finished with mod podge.
For the leg belt, I chose a slim black belt with an intricate buckle and cap. I wrapped it around my thigh for size, then cut it to the length I needed. I then re-shaped the end of the leather and placed the metal cap back on. Finishing off the belt by adding new holes with leather punch and awl.
The two centre belts were exactly the right size for my hips/waist and so I didn't want to make too many alterations in case they didn't fit again. I unstitched the front of the belt and removed the existing buckle, replacing it with one of the 3D printed buckles that I bought and stitching it back in place. On the opposite end of the belt, I added more holes to the edges, and wrapped it through the other side of the buckle, stitching it in place.
Finally I sewed a cummerbund from the same fabric as on the jacket and cape. I added some belt loops to hold things in place, but ended up not needing to use most of those loops.
Cape:
For the Cape, I had some help figuring out how the pattern should look in order for it to fold and fall correctly over the shoulder. I then cut out two capes, 1 for lining and 1 of the outer fabric and stitched them together. I lined the edge with a gold ribbon I found. Then I passed the cape off to a friend who embroidered the Assassin's Creed logo on it.
In order to attach the cape to the jacket, I bunched up the top and fastened it underneath an epaulette, and attached two industrial snaps to the cape and jacket. This was to ensure that it wouldn't slide or pull the jacket as I am walking around conventions!
The only things on this costume I didn't actually make were the gloves, the hidden blade, the belt buckles and the boots.
Thoughts on this costume:
I am so over the moon on how this costume turned out. There were a lot of learning curves for this piece, and a lot of things that went wrong which was disheartening and very hard to push through. But I am so glad that I did persevere. It's the most complicated costume I have made to date, but also the most detailed, super comfortable and easy to maneuver. I can't wait to show this one off!
In progress photos
Appearances:
Fan Expo Vancouver 2020
Fan Expo Vancouver 2020